Monday, November 30, 2009

Yakisoba & Egg Rolls


This is one of my absolute favorites! When I was in the Army we use to make it all the time. When I tell people about it they usually respond with something like "Yaka...what?" but trust me it's yummy! I'm not even sure if it's Chinese or Japanese style but either way it's way cheaper than take out. The most expensive part is the egg rolls. I buy them from Walmart's freezer section for about $3 per box of 4.
What you'll need:
Linguine - 1 box
Ground Beef - 1 lb.
Red Onion - about half of 1
Green Peppers - 2
Soy Sauce - to taste
Worcestershire Sauce -to taste
Egg Rolls - depends on how much you like them (frozen)
Preheat the oven to the suggested temperature on the egg roll box. They take about 18-20 minutes so you'll want to get them in as soon as it's preheated. I always flip them about half way through the cook time.
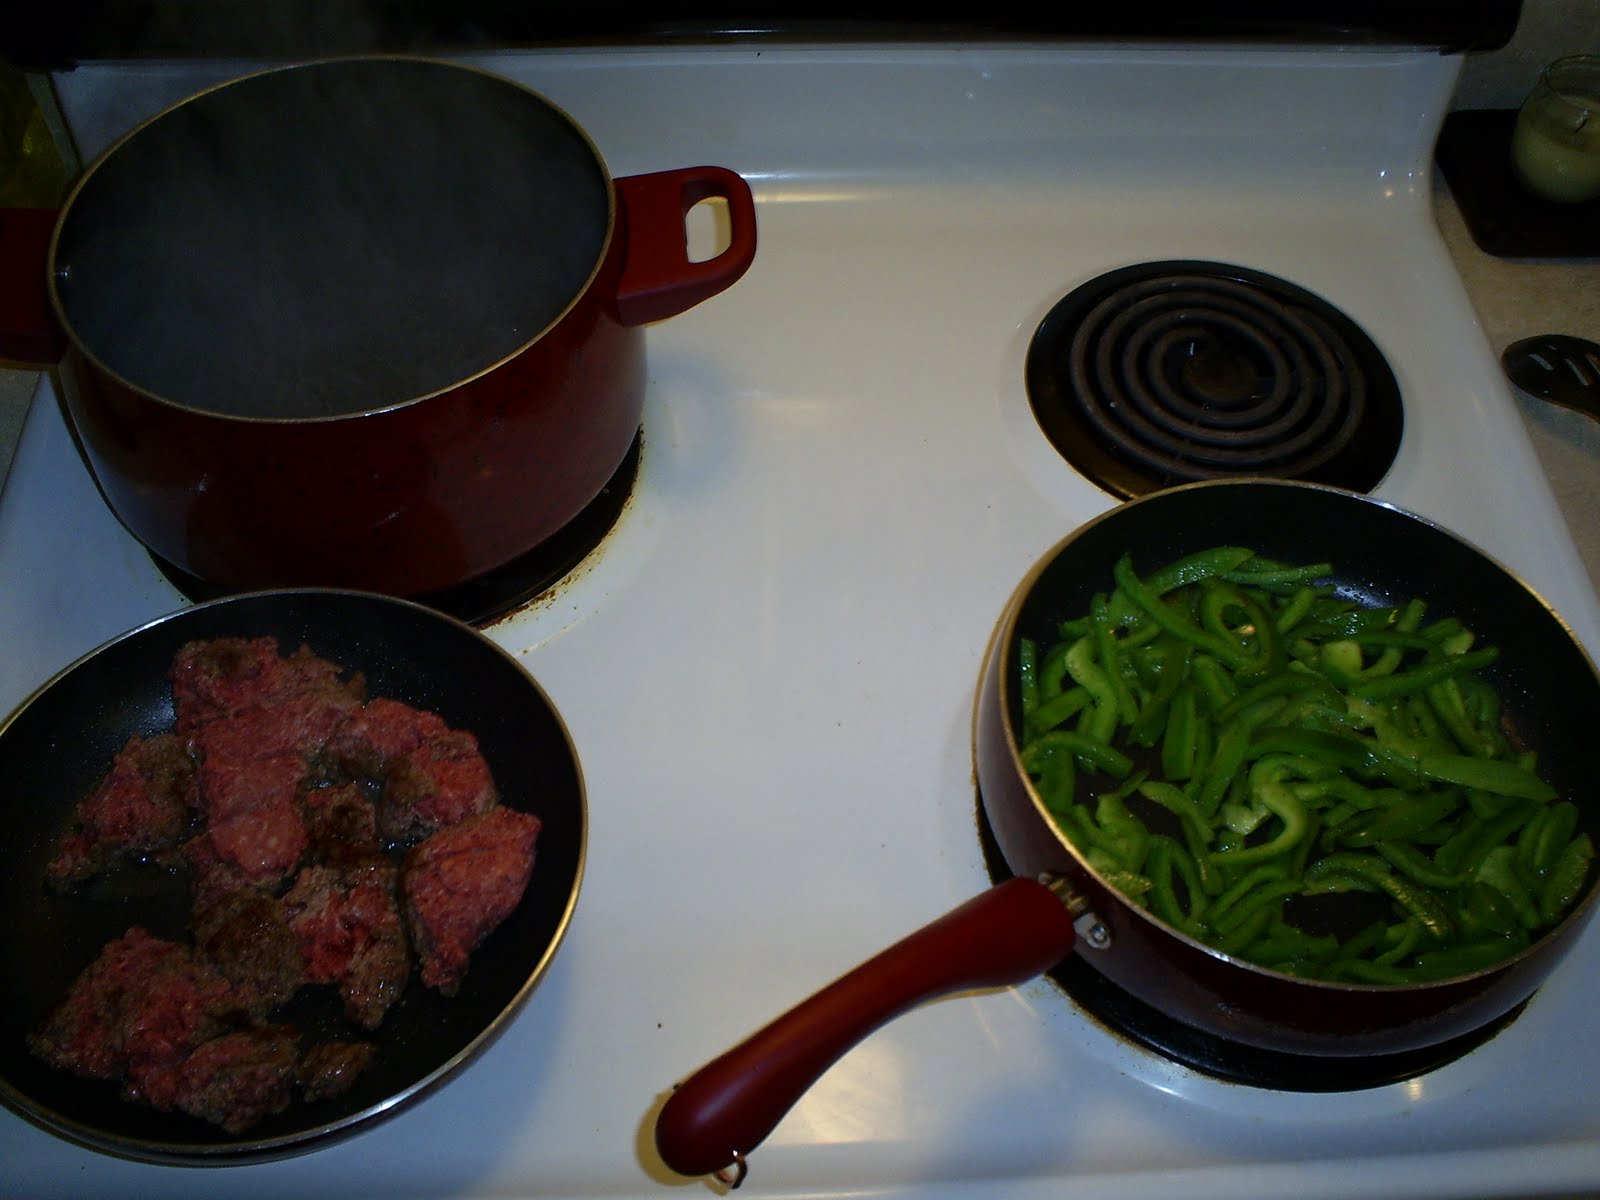
Fill a large pot with water and set on high (when it starts to boil get the linguine started). This meal will cook quickly and requires multi-tasking....but do not be alarmed....if I can do it so can you (and it's worth it). While you are waiting for the water to boil you should slice the two green peppers in thin slices. (don't forget to get those egg rolls in the oven).
You'll need two skillets both set on medium heat. In one you'll begin to cook the ground beef. In the other add a little vegetable oil (or olive oil for a healthier choice) and saute the peppers. You'll need to stir both of these pans pretty often. Adjust the temperature as needed so that they don't cook to fast or too slow.
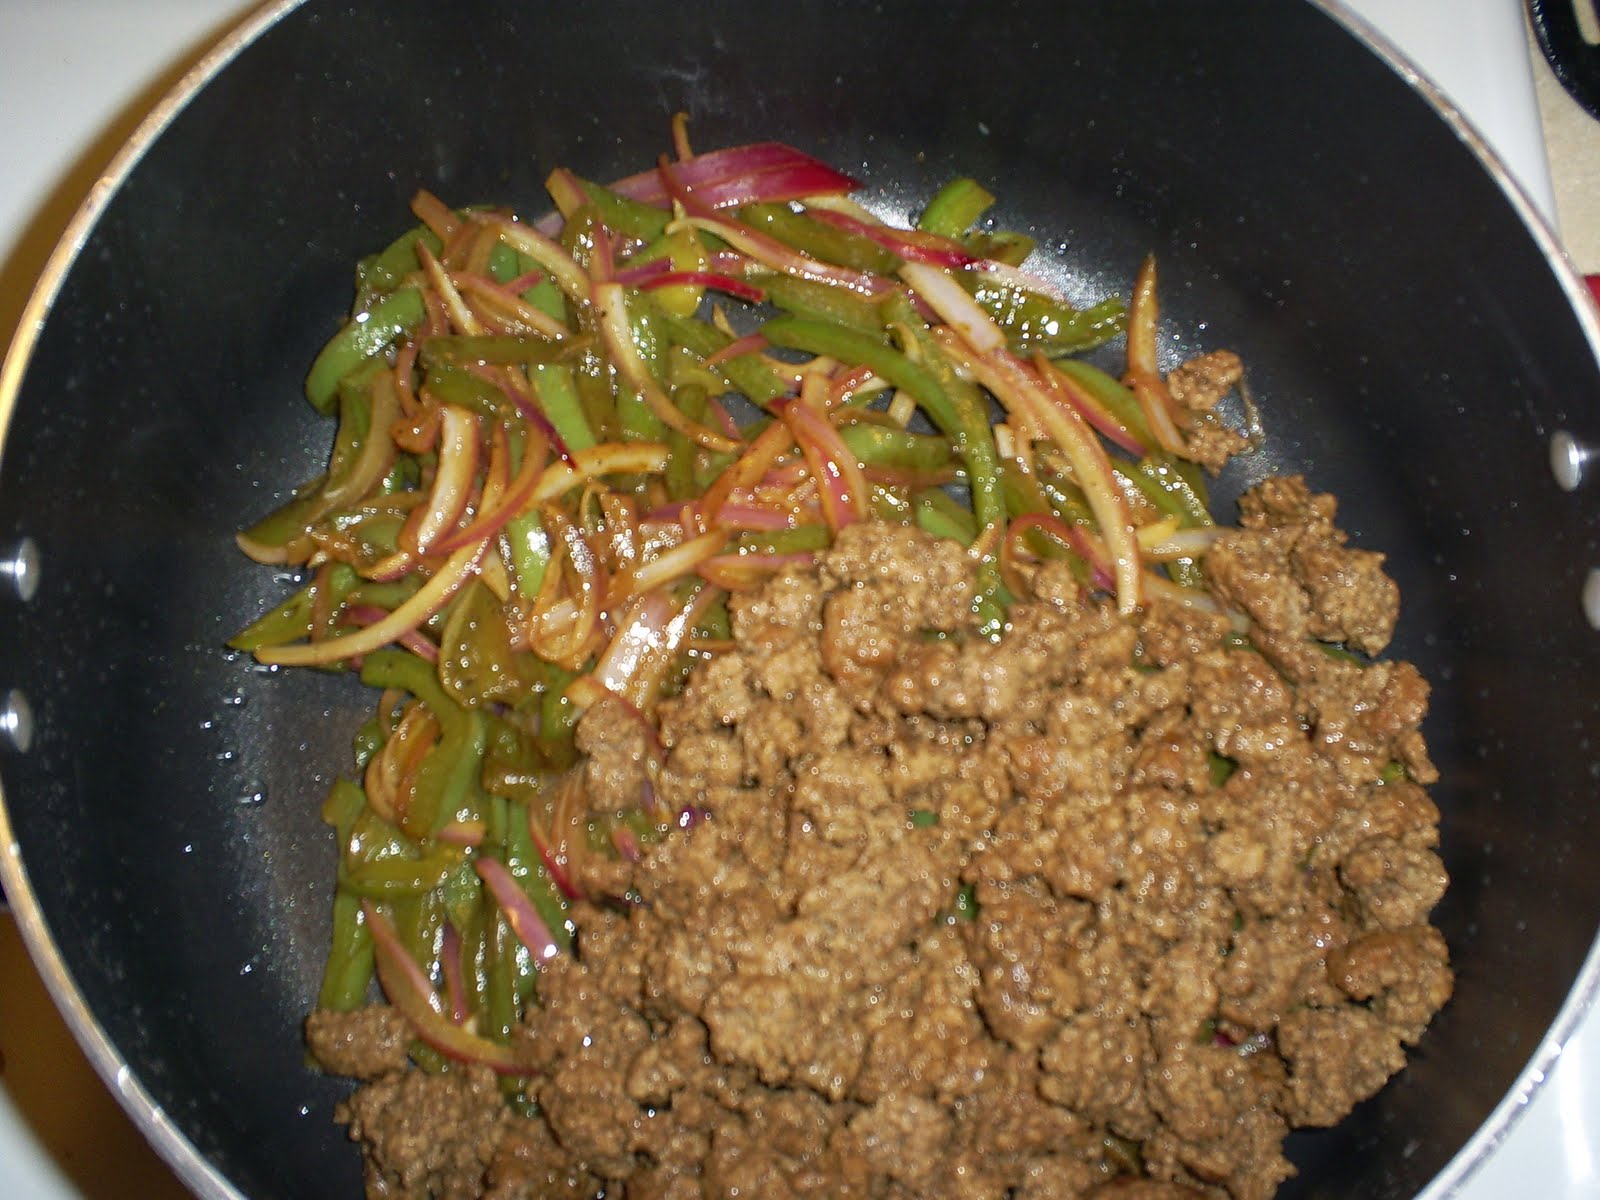
While these cook you can thinly slice the onion. When the peppers are about half way done you'll want to add the onions to the mix. When the ground beef is done drain all the grease off. I suggest doing this into a can and not your sink. It took a while but the grease eventually clogged my garbage disposal. Once you've drained the grease you can add worcestershire and soy sauce to the meat and the veggies. You are just seasoning them so they shouldn't be floating or anything. Do NOT add salt to this meal! (and this is coming from a salt lover) Soy sauce is salty enough and more salt could very easily ruin dinner.
When the noodles are done (which, by the way, I always set a timer and never go by sampling the noodles every time I think they might be done. So much easier and fewer burns on the roof of my mouth) strain the water and put them back in the large pot. Add the ground beef and the peppers and onions to the noodles and season with black pepper, soy sauce, and worcestershire sauce. Let the pot sit for a couple minutes so that the sauces can soak in a little.
Serve with egg rolls and you don't even have to tip the take-out driver!


Monday, November 23, 2009

Quesadillas & More..


What you'll need:
Tortillas - medium/small (2 per # of quesadillas)
Shredded Cheese (8 oz. will make about 5)
Meat (optional) *typically chicken
Mexican Rice (packaged)
Refried Beans
Sour Cream
Preheat the oven to 400.
Pour about 2 tablespoons of vegetable or olive oil into a frying pan on med-high. When it starts to heat up add your meat. I went with chicken but it's also great with just cheese, sliced steak, etc. You can even add some peppers, onions, tomatoes, or other veggies but I didn't have any on hand and I was kind of in a hurry. You can chop the meat into cubes before you begin cooking it if you like. I prefer to cook it most of the way through and then chop it and cook it a little longer (only because raw meat is harder to chop). Season the meat as you like. I used my four favorites: salt, pepper, onion powder, and garlic powder + a little chili powder. On occasion I buy taco seasoning and it makes it even better.
Once the chicken is going prepare the packaged rice as directed. The rice is usually done in about 8-10 minutes and then I put a cover on it if I'm still cooking. The beans are even easier. I buy refried beans (in a can) and spread them about 2 inches thick in a small casserole dish. Then I top with a little shredded cheese and bake for about 10 minutes. The edges will start to bubble and pull away from the side of the dish and you'll know it's done.
Once the rice and beans are cooking I chop my chicken and cook it a little longer to make sure it's completely done. When it is, I set it to the side. Heat a large fry pan (at least as big around as your tortillas) over medium to medium-high. Make sure you have your cheese and chicken close by because this has to be a semi-fast process so the tortillas don't burn.
When the fry pan is hot spray it with pam and lay your first tortilla in it. Sprinkle cheese evenly over the tortilla and then add the meat and any veggies. Sprinkle a little more cheese so the second tortilla will stick together with the first. Press the quesadilla together with the back of your spatula. By lifting the edge just a little and checking to see if it is browning you'll know when it's time to flip. Right before you flip it spray pam on the tortilla (not to much now)...then flip! This is the reason I choose small or medium tortillas. They're much easier to flip. Brown the other side and then move it to a plate or cutting board.
I cut them like slices of pizza, add the rice and beans to the plate, and top with a little sour cream. This meal is a kid favorite!


Friday, November 20, 2009

Cracker Barrel


Just looking at this picture makes my mouth water. I hadn't been to Cracker Barrel in so long that I almost forgot how good their food was. I was quickly reminded when my plate arrived!

Before we get to the food though let me just say that the service was terrific. A nice gentleman held the door open as he greeted us and our server was a very sweet lady with great Southern hospitality. They also have the coolest little store before you get to the dining area. This time of year most of it was filled with Christmas decorations and such but they also have great deals on unique toys and gifts. I'd actually go there to shop without eating in the restaurant...although the food would be hard to resist.

You can order breakfast any time of the day, which I LOVE, but I was in the seafood mood. I ordered the "Farm-raised Catfish Platter." It can be ordered grilled and a little spicy or breaded. I went with the grilled and was served two big fillets with great texture. You also get to choose 3 sides from about 15 options. I went with mashed potatoes and gravy, mac-n-cheese, and country green beans. The potatoes were thick and slightly lumpy (just the way I like them, definitely home-made) with a perfectly seasoned gravy. The mac-n-cheese was creamy and very cheesy and the green beans tasted like they had been cooked with ham. So yummy!! It also came with one corn muffin and a really fluffy biscuit.

The meal ran $9.19 and I ordered water with it to keep the cost down. I typically go for less expensive restaurants, but for the quality and service the price was well worth it. I will definitely be returning!

You can check out their menu here:

http://www.crackerbarrel.com/menu.cfm?doc_id=170

Thursday, November 19, 2009

Clam Chowder ....QUICKLY!


This meal is sure to leave your family with a warm, full belly...and in a hurry! It was such a rainy, gloomy day that I resorted to this favorite of mine. As you can see in the pictures this one if far from being home-made, but I would like to try making clam chowder from scratch one day....when I have a little extra time (ha!). Until then it's so good and inexpensive in the can that it works for me.
What you'll need:
clam chowder in a can (about 1 can per person, less for a child)
soup crackers
shredded cheese
corn bread mix (+1 egg, and 1/3 cup milk per box)
This was my first time making cornbread with this meal but it went really well with it. To be honest the Jiffy cornbread mix was on sale last month so I bought way too much and needed to make use of it.
Preheat the oven and mix the cornbread as the package instructs. I really have no brand preference on the mix but like I said the Jiffy was on sale and it's pretty good. Yes, the batter is suppose to look thick and a little lumpy. And if anyone has any tips on how to get the batter in to the muffin cups without making a mess all over the pan I'd love to hear it (see pictures as evidence).
Once the cornbread is in the oven (bakes about 15 minutes, that's why I start those first) pour your cans of soup into a pot and cook over medium high. Make sure you stir it frequently so that the bottom doesn't burn. If it starts to boil turn it down to medium.
When the cornbread comes out you can dish up the soup. I always top it with shredded cheese (because what's not better with a little cheese on it?) and soup crackers. I prefer the goldfish cracker because my daughter likes the fish "swimming" in her soup.
Now that dinner is done for under $10 and in under 20 minutes.....you'll have time to fold that laundry and assist with homework ;)


Wednesday, November 18, 2009

My First Quiche


A name like "Quiche" has always intimidated me. Sounds a little too fancy to make....and by fancy I mean difficult. However, it turns out there is nothing fancy about scrambled eggs in a pie crust. That's not exactly what Quiche is but that's the basics of it. Fancy or not....I went back for seconds. Yummmmmy!!

What you'll need:

2 deep dish pie crusts (8-9 inches) *freezer section
10 eggs
2 cups heavy cream (that's 16 oz's)
1.5 cups shredded cheese (your favorite)
meat & veggies
*this is very flexible. I picked bacon & spinach for 1 pie, and sausage & mushrooms for the other. You can leave it plain and add more cheese or mix it up a bit. As for the amount- you'll need enough to line the pan as pictured. I used about 10 strips of bacon, most of a bag of spinach (salad mix size bag), 3/4 tube Jimmy Dean B-fast sausage, and about 2/3 a pkg of fresh mushrooms (in the can works fine too). I also used onions in both.

Move the pie crusts from the freezer to your refrigerator in the morning so they can thaw. I'll admit I forgot to do this so they only thawed on the counter for about 30 minutes...but they still turned out great so I lucked out.

Preheat the oven to 400.

I started by cooking the bacon in a big pot (the big pot makes cooking the spinach easier later). Once you have the bacon going start the sausage cooking in a frying pan. When the bacon is done remove it LEAVING THE GREASE IN THE POT. Put the fresh spinach in the bacon grease. It will only take a few minutes of stirring on medium to be cooked. The spinach will shrink a lot so cook more than you think you'll need. You'll know it's done when it looks wilted and slimy (gross, I know, but go with it). When the sausage is browned through add the mushrooms to the pan and stir a few more minutes. You can put the bacon back in with the spinach and add onions to both pans (if you like). Keep these pans both going on low and crack all 10 eggs into a bowl. Add the heavy cream to the eggs and beat them well. I added salt, pepper, garlic powder, and onion powder to the egg mixture.

Place both pie crusts on a cookie sheet. If you're like me there will be some spillage and the pan will catch it. Spoon your "meat & veggie mixtures" into the bottom of each pie crust. Do not fill it to the top. I tried to get a good picture of mine so you can see how high to fill it. Once this is done sprinkle with cheese. Pour half of the egg mixture over 1 pie, and the rest over the second pie.

They will need to bake at 400 for 15 minutes. When the time is up, reduce the temperature to 350 and bake for another 35 minutes. Check it at about 25 minutes though....if the top is browned it's probably done. I was pretty hungry by the time they came out so I cut right into it....however it was easier to serve after a few minutes of cooling.

This was my first time and I really liked the results....but if you have any suggestions I'd love to hear them :)

Tuesday, November 17, 2009

Pigin' Penne


What you'll need:

Penne Pasta (or ziti) - 1 box
Spaghetti Sauce - 1 can or jar
Ground Italian Sausage - 1 lb
Green Peppers - 1 large or 2 small
Onion - to taste
Ricotta / Parmesan Cheese (both optional)

I decided to make this dish because I had some left over ricotta and a box of penne pasta. In this economy it's all about using whats already in the cabinets and being flexible with the recipes. I also made garlic bread with a couple hoagie rolls that were getting too close to expiration.

Preheat the oven to 400 (only if you plan to bake garlic bread). You can also accompany this meal with frozen, premade garlic bread like I often do and in that case just follow the package instructions. Begin to boil enough water for the pasta to cook (in a large pot). Chop the green peppers in chunks about the size of a dime and the onions about the size of a pea. Using a little vegetable oil (or olive oil is a healthier choice) in a frying pan start to saute the peppers on medium. After a few minutes have passed add the onions and a little salt and pepper. Peppers take longer to cook so to prevent burnt onions I always put them in a little later. If your water is boiling get the noodles in it and set a timer for the suggested cook time on the package. You'll need a second skillet to brown the ground sausage. I don't suggest cooking raw meat and vegetables in the same pan because of the famed "cross contamination." Plus, you can't stop one from over cooking if the other isn't quite done yet. Trust me....it's just safer all around.

While everything else cooks (don't forget to check and stir frequently) you can start buttering those hoagie rolls (or bread, hot dog bun, etc.). I go a little thick on the butter and then sprinkle with garlic powder, onion powder, salt, pepper, and if I have it....a little shredded cheese. These won't need to bake long so when you have about 5 minutes left on the pasta timer get those in the oven.

Drain the pasta and put it back in the pot you cooked it in. This is why I suggested a "large" pot....it will need to hold all of your ingredients. Add the cooked sausage (which shouldn't need to be drained but definitely drain it if there is a grease build-up) and the peppers and onions. Pour the can/jar of sauce over it (don't worry, the hot noodles and sausage will warm it up, no need to cook it first). If you want to add some cheese you won't get any argument out of me. I LOVE cheese in just about anything. Like I said, I used the left over ricotta I had (about 1 cup). Mix it all together and enjoy. Don't forget the bread in the oven....this can be hazardous ;)

Monday, November 16, 2009

Halloween Cake...just a little late

I know Halloween has come and gone but this cake was too good not to
share.....and fun to make! Did I mention easy? Most of my recipes will either be easy to do, copied from another site (and then tried and photographed by me), or made from the box in a hurry. I'm not trying to stake my claim at being the next "top chef" or even a good cook....just having a little fun with cooking for my family. Ok, so here it is:

Jack-O-Lantern Cake

I cheated and used cake mix out of a box. I picked lemon and then used yellow food coloring to brighten it up some....but you can use vanilla, butter cake, or any other flavor mix that won't interfere with the process of dying it yellow. Since I've become a mother I seem to go through a lot more food coloring. It makes everything more fun!

You'll need 2 round cake pans (8 or 9 inches). I still need to invest in a couple round cake pans so for this impulsive adventure I bought the cheap foil kind for around a $1 and they worked great (and made clean up easier). I sprayed the inside of each pan with a little pam, or rub a little vegetable oil in them, and then sprinkle a little flower in the bottom of them. Then you hold the pan in one hand and tilt it to the side while you tap it from underneath, moving it in different directions to coat the pan in flower. I promise it's not nearly as complicated as it sounds and it will make getting the cake out of the pan so much easier.
I also used store bought frosting and colored it with food coloring (using red & yellow to make orange). I bought an over-sized can and then got worried it wouldn't be enough so I added a little shortening and powdered sugar to it (which is a quick way to make frosting). I ended up with way to much so you should be fine with 2 regular cans, or the new over-sized can they have.
After you've baked the 2 cakes you'll dump one out onto a plate and frost the top of it. Then you'll need to dump the other one out but you may want to do that on the (clean) counter or another plate. If you try to dump it out right onto the other cake it might not turn out as planned. Place it on the frosted top of the other cake. Frost the entire cake with the rest of your orange frosting. I used dark chocolate chips (yum!) to make the jack-o-lantern face and topped it off with a little green frosting for a stem. (I made the green frosting out of a little bit of frosting I set aside before dying the rest of it orange). I also put some of the chocolate chips in between the two layers of cake....just because I love chocolate. Have fun with the face and be creative!! My daughter had a lot of fun making this one with me and loved how it looked like a lit-up jack-o-lantern when we cut it open.